

SOURCE: Published repair instruction of SAF Holland Group
(summarized slightly)
Steps to replace SAF pivot bushing: In order to replace the SAF pivot bushing, first thing we need to do is removing the old pivot bushing using the removal tool and then installing the new one using the installation tool. I have to say that pivot bushing replacement tool can be used both for removing the pivot bushing (removal tool) and for installing the pivot bushing (installation tool). In this first post, the steps of removing the pivot bushing is discussed.
NOTICE! DO NOT use an impact wrench to turn the pivot bushing replacement tool. Instead use a box wrench or a socket wrench (width across flats: 46 mm)
- Preparation
Prior to removing the pivot bushing, perform the following steps observing the safety instructions:
1.1. Place wheel chocks in front of and behind the trailer wheels to prevent the trailer from rolling.
WARNING! Filure to use wheel chocks might allow the vehicle to roll which could result in death or serious injury.
1.2. Bleed all air from the air suspension system.
1.3. Place jacks under the trailing arm.
1.4. Remove the adjustable pivot bolt.
1.5. Remove the shock absorber from the trailing arm.
1.6. Lower the axle.
2. Removal
2.1. Preparing the pivot bushing removal tool.
The pivot bushing removal tool consists of a (1) hex-head threaded rod, (2) two thrust washers, (3) a thrust bearing, (2) two more thrust washers, (4) a cover plate, (5) a receiver .tube, (9) and a drive nut as illustrated in the picture 1
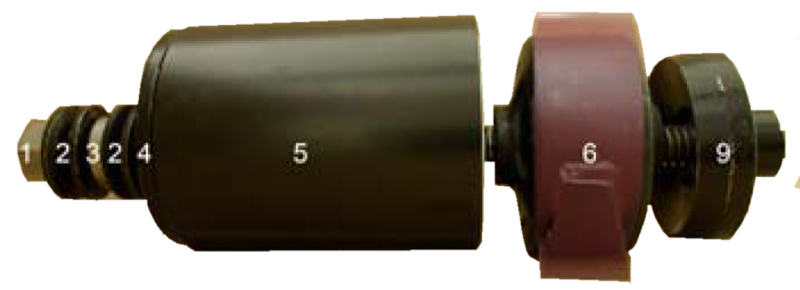
Prior to removing the pivot bushing, assemble the removal tool correctly. for this purpose, (figure 2)place the following components on to the threaded rod.
- Two thrust washers(2)
- Thrust bearing (3)
- Two thrust washers (2)
- Cover plate (4)
- Receiver tube (5)
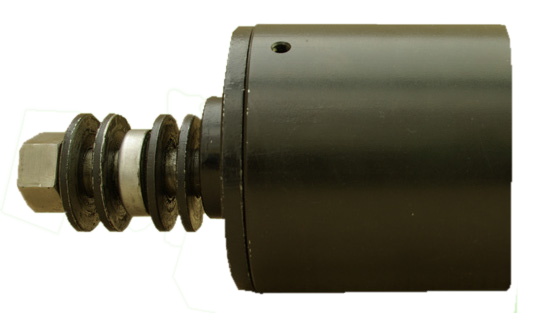
IMPORTANT! When assembling the removal tool, always make sure that the receiver tube end (5) without the centering ring faces toward the cover plate. The centering ring (fig. 3) of the receiver tube is used to center the receiver tube on the trailing arm receptacle. When the removal tool is used, the centering ring must always face toward the trailing arm receptacle.

2.2. Removing the pivot bushing
IMPORTANT! The pivot bushing must always be replaced in pairs on an axle. Always remove and replace one pivot bushing before beginning to remove the second pivot bushing in order to make sure that the pivot bushing that still has not been removed, is available as a reference point for adjusting the spring center correctly.
To remove the pivot bushing proceed as follows:
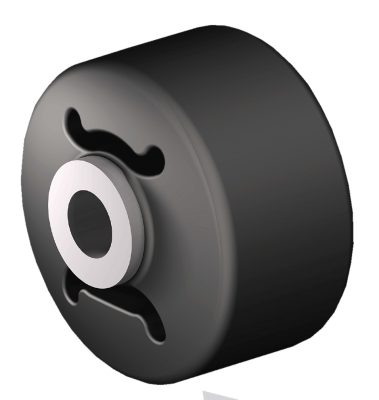
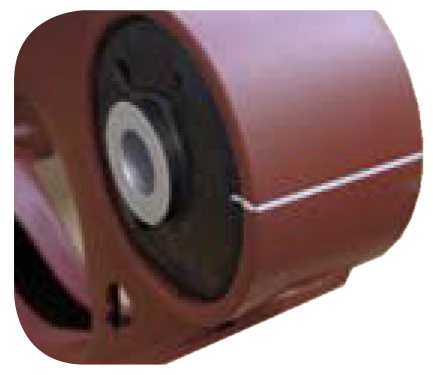
- Identify the raised position locator ( whitened in the figure and indicated by the arrow) on the pivot bushing (fig. 4) for marking purposes.
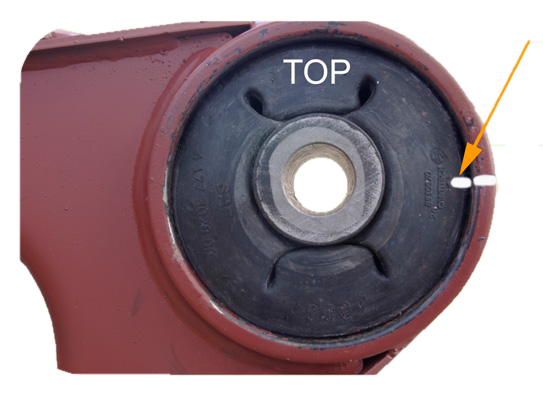
2. Using a white marker pen, draw a line (Fig. 5) on the outside of the trailing arm receptacle at the raised position locator of the pivot bushing. This line marks the orientation of the existing pivot bushing within the receptacle and will be used to properly orient the replacement bushing during installation.
- Failure to properly install bushing will reduce vehicle stability which could result in death or serious injury.
- Please ensure the correct installation position.
3. Lubricate the thrust bearing (3) and the threads on the threaded rod (1). Use standard grease.
4. Insert the threaded rod end (1) of the correctly pre-assembled removal tool through the whole in the pivot bushing until the centering ring of the receiver tube (5) hits the receptacle (6).
5. Position a wrench on the hex-head rod (1) and turn it until the drive nut (9) and the pivot bushing are completely drawn into the receiver tube (5).
6. Remove the removal tool from the trailing arm.
7. Continue to push the pivot bushing until it is forced into the winded section of the conical receiver tube (5) from where it can be easily removed.
8. Reverse the wrench to disassemble the removal tool.
9. Clean out pieces of old bushing and any foreign material left in the receptacle using a wire brush.
That`s all about removing the pivot bushing. The installation of the pivot bushing will be discussed in the next post, second part of this post.